在树莓派上部署消息推送软件Gotify
iOS的推送很好用,而安卓的就一言难尽了,全平台的推送本来可以用微信服务号,但微信将在4月下线模板消息。不如自建一个即时,不受限的推送服务。Gotify是用Go编写的,依赖简单无冲突,不用docker,直接在系统上跑更合适。
需求
全平台的推送本来有基于微信服务号的Server酱,WxPusher等,但微信将在2021年4月30日24:00下线模板消息。我也试过企业微信,但是用了几天后bot发的消息就被拦截了。
Gotify的优缺点如下:
👍通过REST-API发送消息,调用方便。
👍Go编写,效率高,响应快。
👍支持插件。
👍不受服务商限制,隐私性强。
👎安卓需要常驻后台。
👎不支持iOS。
由于没用到FCM,故安卓端需要在常驻通知栏以保持监听,不过用了几天感觉对耗电和内存的影响很小,可以接受。iOS可以用Bark,更简单。
注:适合在国内服务器部署。国外特别是套CF会导致延迟很高,有时会发送超时而失败。
安装Golang(可选)
如果不想从源码编译可以跳过此步,直接下载编译好的二进制执行文件即可。
1 | mkdir ~/goinstall && cd ~/goinstall |
新建install.sh:
1 |
|
去官网下载对应操作系统的最新版本Golang并安装。
1 | wget https://golang.org/dl/go1.16.linux-armv6l.tar.gz |
编辑~/.bashrc,设置相关环境变量,其中最后两行是改为国内源(可选)。
1 | export GOPATH=$HOME/go |
安装Gotify
去Releases处找到对应版本的下载链接。
1 | wget https://github.com/gotify/server/releases/download/v2.0.21/gotify-linux-arm-7.zip |
为了操作方便切换成root。
1 | sudo su |
解压到/opt/gotify/。
1 | unzip gotify-linux-arm-7.zip -d /opt/gotify/ |
下载配置样板。
1 | mkdir /etc/gotify |
编辑/etc/gotify/config.yml。将port改为8080,name和pass是管理员的用户名和密码。
通过nginx反代
在nginx的网站配置文件增加以下内容:
1 | location /gotify/ { |
这里假设gotify是在网站的子目录/gotify/下运行。如果是根目录则删掉rewrite,location处改为/。
设置开机自启服务
编辑/etc/systemd/system/gotify.service。
1 | [Unit] |
开始并启用服务。
1 | systemctl start gotify |
然后打开https://example.com/gotify/访问管理页面。
使用
用配置文件设置的密码登录后,需要点APPS——CREATE APPLICATION新建应用,获得令牌Token。
客户端登录后会自动添加在CLIENTS,不用手动添加。
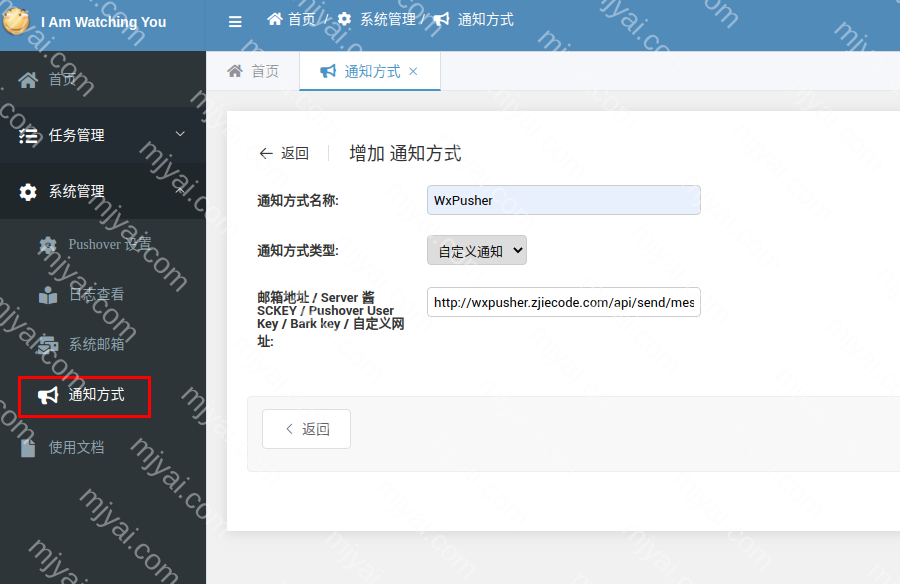
这里以WebMonitor为例,点击设置——通知方式——增加,增加自定义通知。自定义网址处添加如下内容:
1 | https://example.com/gotify/message?token=你的应用令牌{data={ "title":{header}, "message":{content}, "priority":5}} |
注意某些安卓系统需要在设置处开启Gotify的通知权限,如声音,常驻通知栏等,以及让该应用不被内存清理掉。